
Glase payment in a POS
Integration procedure
Follow these steps to configure your point of sale for integration with Glase:
- Implement the required methods
- Register point of sale with Glase
- Assign Glase id
- Add Glase as payment in your point of sale
- Verify your integration
- Go live!
Implement the required methods
The methods required in a basic integration are:
| Method | Description |
|---|---|
| registerTerminal | Registers a new terminal in Glase server |
| unregisterTerminal | Unregisters an already registered terminal |
| assignSeqrId | Assigns a Glase ID to a terminal |
| sendInvoice | Sends an invoice to Glase server |
| getPaymentStatus | Obtains status of a previously submitted invoice |
| cancelInvoice | Cancels an unpaid invoice |
| refundPayment | Refunds a previous payment, partly or the whole sum |
For an extended integration, also these methods can be used:
| Method | Description |
|---|---|
| updateInvoice | Updates an already sent invoice with new set of invoice rows or attributes |
| markTransactionPeriod | Marks the end of one and the beginning of a new transaction period; used in reporting |
| executeReport | Executes a report on Glase server |
Refer to section API for detailed description.
Register point of sale with Glase
(Method: registerTerminal)
- Each point of sale in the checkout line is called a “terminal” in Glase.
- Register and unregister point of sale against Glase are separate functions in points of sale.
- Glase payments do not work in point of sale without a proper registration.
- Reseller user id and password stored in back office are used when a new Glase terminal is registered.
Note! Each terminal is added only once. For example, if the checkout line contains five points of sale you also need five terminals registered in Glase. Any new or reinstalled point of sale must be registered against Glase.
Sequence (simplified)
Point of sale menu
The Glase terminal menu in the point of sale can be accessed with administrative rights. The menu on the point of sale may look like this:

Both parameters terminalId and password are stored in the local database after successful registration.
Add a terminal
Preferably done in the back office.
-
Create a context for administrative tasks using RESELLERUSER as the principal type. You have received your account information in a separate document from Glase.
-
Call registerTerminal to add new terminals into the Glase system. Save the password you generated together with the terminal id received from Glase system for further usage.
Note! The terminal id that is received as response, must hereafter be used in every method that is called, for the particular terminal/point of sale.
Example of registerTerminal:
from suds.client import Client
import logging
import random
import string

# only for debugging
#logging.basicConfig(level=logging.INFO)
#logging.getLogger('suds.client').setLevel(logging.DEBUG)

client = Client('https://extdev.seqr.com/soap/merchant/cashregister-2?wsdl')
context = client.factory.create("ns0:clientContext")
context.clientRequestTimeout = 0
context.initiatorPrincipalId.type = 'RESELLERUSER'

# the following three parameters are provided by seamless for each shop
context.initiatorPrincipalId.id = '{your_reseller_id}'
context.initiatorPrincipalId.userId = '9900'
context.password = '{your_reseller_password}'

def generatePassword(size):
    return ''.join(random.choice(string.ascii_letters + string.digits) for i in range(size))

password = generatePassword(15)

# register the terminal
response = client.service.registerTerminal(context, 'externalTerminalId', password, 'POS #2 in My Shop')
print "Terminal registered, terminal id: %s , terminal password: %s" % (response.terminalId, password)
Assign Glase id
(Method: assignSeqrId)
When getting a payment through the point of sale, we cannot show the payment QR code which is generated for the invoice to the Glase user. To overcome that problem, we assign a fixed QR code to each point of sale. A point of sale Glase sticker looks like this:

Each QR code sticker has a unique number assigned known as Glase ID. The point of sale needs this number to establish a link with the QR code.
The cashier starts the sequence to assign the Glase ID from the Configuration menu in point of sale and Glase ID registration submenu. It is possible to enter the number manually or by scanning the QR code with a scanner. The scanner must be configured to accept Code 128 in order to read the barcode on the QR sticker.

The parameter glaseId is stored in the local database after a successful assignment.
-
Create a context for terminal usage by setting the principal type to TERMINALID. Supply the context with password and the terminal id as you saved for further usage when the terminal was created.
-
Call assignSeqrId to assign the Glase ID currently in use by the point of sale.
Add Glase as payment in your point of sale
This section describes an example of Glase payment from a cashier’s perspective. Refer also to Basic Glase payment, which shows how to implement the code with sample flow.
Glase must be added as a new payment method. Glase can only be used started when an active receipt exists and the amount to pay is greater than zero.
1. Start the payment by pressing the Glase payment button in point of sale
The amount to pay is pre-entered in the point of sale dialog. The cashier can choose to increase or decrease the pre-entered amount.
If amount to pay with Glase is less than the total amount (for example if some part is paid with card or cash), then Glase should be used LAST among all the different payment types, so that the total amount minus the cash/card amount shows the exact total amount that is to be paid by Glase.
2. Press the Pay button
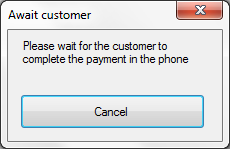
It is possible to cancel an ongoing Glase payment by pressing the Cancel button (method used: cancelInvoice). This option is only available before the payment is committed on the Glase server. The dialog below is displayed to the cashier until the paying customer has completed the payment on the phone:
The point of sale calls the Glase server each second while waiting for the payment to complete (see Get payment status below). The status code returned is “please wait more”, “payment completed” “canceled” or “an error occurred”. When the Glase payment is complete a transaction post is written to the receipt file. The transaction post contains the following data:
- Amount
- Reference number (ersReference)
- Description “Glase payment”
- Timestamp
3. Configure the printer to include the following data as a confirmation of the purchase:
- Amount
- Reference number (ersReference)
- Description “Glase payment”
Note!
- It is not possible to perform a Glase payment against Glase server when point of sale is offline.
- All payments made by Glase must be recorded, preferably in a separate account in the back office. A report can be generated, preferably in the back office – for more information, refer to Reporting.
4. Send invoice to Glase
(Method: sendInvoice)
The cashier starts a new payment sequence:
- Create a context for terminal usage by setting the principal type to TERMINALID. Supply the context with password and the terminal id as you saved for further usage when the terminal was created.
- Create a new invoice, including:
- Cashier id/name
- Total amount for the entire invoice
- Issue date, when the invoice was created
- Invoice title
- ClientInvoiceId (a link between Glase and your own system)
- Invoice rows (articles, discounts, other payments)
Note! The sum of all invoice rows must be equal to the total amount of the invoice. You are allowed to create negative rows just to balance the invoice.
5. Get payment status
(Method: getPaymentStatus)
This function obtains status of a previously submitted invoice. Do the following:
-
Create a context for terminal usage by setting the principal type to TERMINALID. Supply the context with password and the terminal id as you saved for further usage when the terminal was created.
-
Once each second; call getPaymentStatus for 30 seconds until the method returns that payment has completed. If getPaymentStatus is not queried, payment done by Glase user will be refunded.
-
Add questions for the cashier to select either “try again” or “cancel the payment” if the payment has still not gone through after 30 seconds of polling. When selecting “try again” a new poll of 30 seconds is started, with the same reference number. Note! The point of sale must check the status each second, to verify that payment is completed. Otherwise the Glase server does not receive any notification that transaction is finalized and the purchase will then be reversed!
-
Once the payment is complete a reference number (ersReference) is obtained from Glase. Save the reference number for follow-ups and print the number on end user receipts.
Verify your integration
Verify that your integration works and run validation tests towards Glase servers. Contact Glase for more information.
Go live!
To go live with your integration, contact Glase to get certified.